

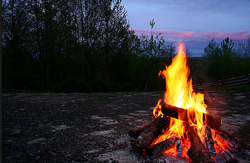
We enjoyed a lovely camping adventure at Cape Chignecto this weekend. Stunning views, beautiful weather... what more could you ask for?
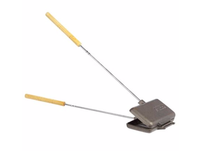
A cast iron sandwich maker from Canadian Tire, that's what you could ask for.
We picked one up before the trip and wow, did it ever open up some healthy eating options. These sandwich makers are a great investment... not only can you make some healthy sandwiches over the fire (the dimensions fit a piece of Udi's gluten free bread perfectly!), but you can think outside of the box and use them for other menu items. Not to mention that they are only about $20 and will probably last forever because they are cast iron. And while we're on the healthy options train: did you know that you can buy gluten free graham style crackers from Sobeys? Just in case you are really missing your Smore days...
I'll list below some ideas to get you started... feel free to share any that you come up with!
Sandwiches
Other meal ideas:
** make sure you are not buying the pre-shredded or grated cheese... companies tend to coat the cheese in wheat to prevent the cheese pieces from sticking together!
A cast iron sandwich maker from Canadian Tire, that's what you could ask for.
We picked one up before the trip and wow, did it ever open up some healthy eating options. These sandwich makers are a great investment... not only can you make some healthy sandwiches over the fire (the dimensions fit a piece of Udi's gluten free bread perfectly!), but you can think outside of the box and use them for other menu items. Not to mention that they are only about $20 and will probably last forever because they are cast iron. And while we're on the healthy options train: did you know that you can buy gluten free graham style crackers from Sobeys? Just in case you are really missing your Smore days...
I'll list below some ideas to get you started... feel free to share any that you come up with!
Sandwiches
- Pizza sandwich: layer bread with pizza sauce and/or pesto, cheese, diced mushrooms, green peppers, onions, jalepenos, pineapple etc, place top bread layer, close lid of the sandwich maker and place in fire for about 7-10 minutes on each side. It is easy to open up the maker and check in to see how the toasting is coming along.
- Classic grilled cheese: need I say more? If you want to get adventurous, add a tablespoon of creamed corn and black pepper... yum!
- Goat cheese and grilled veggie sandwich: If you have the time, you can slice up some red peppers, zucchini, and red onions and place them in the sandwich maker with some olive oil to grill first. Once they are done, layer your bread with the grilled veggies, goat cheese and pesto to toast!
- Breakfast sandwiches: Layer peanut butter with jam or banana for a delicious breakfast toastie in the morning. I haven't yet tried this, but I bet layering an egg with tomato and cheese on the bread for a breakfast sandwich would turn out great too!!
- French Toast: Prepare your bread as you would for French Toast and place in the sandwich maker!
Other meal ideas:
- Pasta: either cook pasta on site, or bring pre-cooked pasta with you. Layer with pesto or pasta sauce, diced veggies (onion, mushrooms, garlic, peppers, spinach etc) and top with shredded cheese **. Cook in fire for about 10 minutes (checking in on it to make sure it isn't burning). Don't flip the maker while cooking, just leave it cheese side up to prevent a mess!
- Grilled veggies: You can slice up any veggies and lay them in the maker with olive oil and salt/pepper (and some oregano, thyme, and basil for a Mediterranean spice) . They will grill up nicely and you can either eat these on their own or add to your sandwiches, salads, pasta.
- Steak: I'm not a meat eater, but I'll add this in for my meat eaters out there: this sandwich maker would probably be a great way to cook up a camp fire steak... or even bacon!
- Leftovers: This sandwich maker can be used if you are in a pinch and didn't meal plan... or spontaneously picked up for a camping trip. Grab your left overs from the fridge, place in the sandwich maker and heat up over the fire.
** make sure you are not buying the pre-shredded or grated cheese... companies tend to coat the cheese in wheat to prevent the cheese pieces from sticking together!
 |  |
 RSS Feed